HOW TO DRAW EARS|| STEP BY STEP EARS DRAWING TUTRIOL FOR BEGAINERS ||[EARS DRAWING OF DIFFERENT FORMS AND ANGLES]
I am here with a brand new Ears pencil drawing TUTRIOL. It's a very easy TUTRIOL for beginners. If you are a beginner follow this blog and you will definitely improve.
Ears comes in all sizes and shapes. It's give an unique look to any character. In a portrait it's the most ignored part, no one gives so much effort for it. But, as a beginner you should know all the facial features. Ears have many bumps and cannel which make it harder to draw. But following those easy steps you can get your desire ears drawing.
YOU ALL NEED THAT :
A lighter HB pencil ,a 3B pencil and a darker 6B or 8B pencil.For blending y ou can use tissue paper water colour brash and blending stump.you can also use your finger tips for blending. But, in this sketch I would prefer blending stump or a water colour brash.
Let's start the process to get the perfect ears drawing for beginners.
FROM SIDE
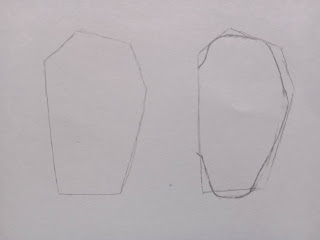
STEP 1: SIMPLE OUTLINE
Let's start with the outline. You have to draw a shape like ear, it's call a hexagonal shape. After this you should drar the outer line of the ear. Draw the second line in the upper side to show the bump. Come in the middle portion,here,you have to draw some lines like in the picture. It's so easy, all you need to do some practice. Now it's it's time for the lower portion called lobule. Now I think you are ready with your outlook. If you are,then grab your ereaser and erease the unnessary lines. You should draw the outline very light so you can erease it easily. Let's check the second step.

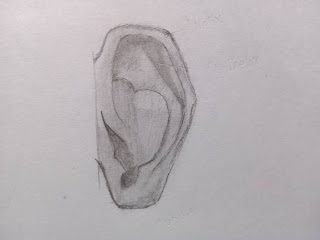
STEP 2: SHADING AND BLENDING
It's time for shading with your lighter pencil. Frist shade the basic layer with your HB graphite pencil. Now grab the 3B pencil and shade the darker area. Now blend the area with your blending tools. Now grab the darker pencil and add some darker value according to your picture. Then blend it again. Again with the dark pencil ,dark some area you neede. You could see there three types of shading........
1.light tone
2.mid tone
3.darker tone
Your different grade of pencils will help you to achieve the result. I wii bring a blog on shading and blending,so,keep eye on that.

STEP 3: DETAILING
Add some details on your drawing. In this situation your darker pencil and your ereaser will help you definitely. Add some highlights,where the light appears. Dark the area where the light could not reach. Again blend it.Yayy!!! You have done the work with great effort and intrest, congrats yourself.
FROM BACKSIDE
It's completely different when you look at the ear from back. In this tutorial I will teach you how to draw ears from backside. Let's start......
STEP 1: OUTLINE OR CONSTRACTION LINE
Start with the very light construction line. Something like previous,just sketch the outline and erease the unnessary lines. You are set with your outline. Observe the image carefully and you will understand what I am trying to say.
STEP 2 : SIMPLE SHADING
Like previous shade the whole thing with light pencil. Hatching technique is very useful for that.once you are done with your basic layer,darken some part with your 3B pencil and blend it. I think it's ready for the next step.
Add details with your darker pencil . Observe the pic and give the details on the pic. Add some dark values and blend it. Repeatedly doing the same process make the image more attractive. Here the drawing is ready.
Hope you guys enjoyed the tutriol,let me know through comments.
YOU CAN READ MY LIPS DRAWING TUTRIOL Here
YOU CAN ALSO READ MY NOSE DRAWING TUTRIOL Here


Comments
Post a Comment